Here's the photo I took yesterday.

There are lots of things wrong, most notably a light leak that comes as a big white splodge on the right. But I was happy with this: because there's no similar splodge on the left. That means the film holder I made works on one side. When I worked out which side is good, which bad (remembering that the image on film is upside down) I could see that one side is slightly better than the other. So all I have to do is fix up the other side too, and that does not seem so difficult now I know that all I have to do is make it like the other one.
Experimental design
There's another tip here. Every experiment should if possible test only one thing. Then you know if it didn't work what was wrong. I'd already tested the film and the developer I was using in another camera and knew that was fine. So that eliminates one possible source of problems. And so on. It's sometimes tempting to rush ahead and try lots of new things all at once, but it doesn't always pay in the long run.
There's something else strange about this photo, but not really so strange because I'd seen it before somewhere else and was half-expecting it. That's the big sideways-on moon-shaped curve at the top. This is because the lens I was using didn't "cover" the huge negative. This is a common problem with large cameras and easily identified. In fact some photographers made it almost a trade-mark, and used such vignetting due to lack of lens-coverage as a feature of their pictures. Eugène Atget was one such photographer.
In my case, I'd rather have this vignette when I choose to have it, and not leave it to chance. That means I will have to modify something to get rid of it, possibly introducing it again when I really want it. But I was surprised it was so noticeable - I was expecting the lens to very nearly cover the negative. When I had put this lens together I had calculated what to expect, and it wasn't supposed to be this bad. I checked my calculations, they were OK. Eventually I decided to check the +1 close-up lens I was using.
The focal length of a lens
A good quick way to estimate the focal length of a lens is to project an image of the sun (which is effectively "at infinity") onto board or paper and measure the lens-to-image distance. (I will have to say more about this later too.) In my case it was about 650mm, and the lens was supposed to be +1 dioptre or 1000mm. That's appalling - very inaccurate. Soon I will be measuring the focal length of some of my other lenses to see if they measure up to what the manufacturer says.
When I redid the calculations with 650mm they came out in line with what I had observed. Again this is bad news in a way, but good in that one more variable has been eliminated. And so it will go on.
Scratches
To finish today, here is a detail from that 20x24 image.
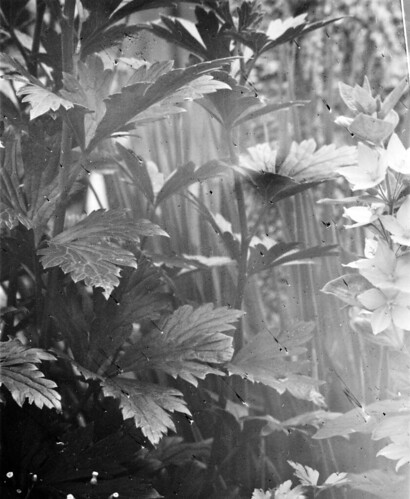
Close-up you see a nice feature - lots of little scratches on the film. This really is an interesting film-hack to know about. There are some wonderful effects with scratched film that would take a photoshopper a month of Sundays to make. (Or do you buy things in photoshop?;) But again, I don't want them all the time so I will have to investigate. There's a clue - all the scratches are parallel. That means I think that they were made when the whole film slid as one piece either cutting or mounting the film in the holder. Another thing to investigate.
No comments:
Post a Comment