I took one photo today, and I am exhausted but happy.
This one photo is with my very biggest camera. It takes negatives that are 20x24 inches (500 by 600mm). Although it's not strictly speaking a camera mod, it's definitely a camera hack, and it deserves a place here, though it is my most ambitious project so far, and it will take a while to explain all the various parts of it.
20x24 is the largest size negative for which is it still comparatively easy to get normal film. Adox black and white film is one possibility. It is just over £150 for ten sheets. When you think that a single sheet is about the same amount of film as six 24-exposure 135 films (35mm) £150 isn't too bad really. But it's frightening to know that that so much film can be used in one photograph.
20x24 cameras used to be, and still are, commercially made. Not surprisingly they cost five-figure amounts.
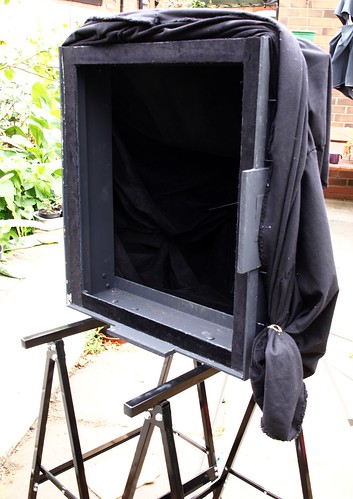
Now, I can't afford £150 for ten shots (let alone the price of processing) right now, but might consider it for special occasions. I certainly can't afford £10000 for a camera, so my 20x24 is done on the cheap. It's almost entirely homemade. The only part that I didn't make was a lensboard (and this was just out of laziness - I happened to have one that was suitable, but I could have made something out of plywood). The camera's made out of MDF with glue and paint and velvet, a large sheet of glass which I frosted myself, and the lens is some random lenses that have been put together in the home-made-lens style. The details will appear on this blog later.
The film is some printers' lith film that I got quite cheaply on the auction site in a roll, and I cut it when I need it into 20x24 sheets. It works out at about 50p a sheet. This kind of film is not designed for pictures but for hard-edged graphic use. So how it can be adapted for making pictures is another story to be told.
Of course you could ask (and are probably asking) "why?" Well again, it fits the overall story here: modern cameras are just too good and I want an interesting bad camera, preferably one that takes interesting pictures that no other could. There are plenty of ways my 20x24's pictures are quite different from those from your digital, or even your normal film camera. And I think with a bit of work they might sometime soon be better, in their own way. I'll have to convince you of that later too.
So all this is for more detailed explanation later. Probably what you want most of all to know right now is what the camera looks like. Well here it is.


It's not something to put in your pocket. It's not something you'd use to take a picture quickly. But perhaps it will produce pictures that are rather different.
This is what I did today.
- Cut a sheet of film and loaded it into the film holder. (1/2 hour)
- Set up the camera, pointed it, focused the lens, measured the light and calculated the exposure. (1 hour)
- Removed the glass on the camera and replaced it with the film holder. (5 minutes)
- Took the picture. (15 seconds)
- Put the camera away. (15 minutes)
- Developed the film. (1 hour)
- When film was dry, contact printed it onto a sheet of photographic paper. (1 hour)
When I am a bit more used to this beast, many of these tasks will be quicker, but that's not really the point.
This was my third picture with the camera, and I am still tweaking the camera, fixing the things that are wrong with it and making it easier to use. I can't show you the picture I took today yet, because it is still wet and drying. Nor can I scan it because my scanner is for A4 maximum. But sometime I will take a digital photograph of it.
Paper negatives
To save time, when I did my first picture with the camera I used a useful trick that can be really helpful for anyone messing about and learning on large format cameras. That is, I used a sheet of photographic paper instead of film. I'd done this previously with my (much smaller) 4x5 inches camera and it taught me a lot. The idea is that you miss out a major stage in the process - the film developing. And paper is much easier to handle because it can be done under red safelights, rather than full darkness. So for my first 20x24 picture it made sense to do it again.
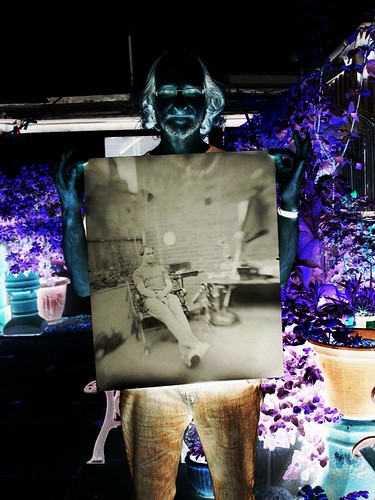
Of course this results in a negative on paper. (Hmm: paper negatives. That's a good topic for later too...) For my 4x5 paper negatives it was easy to scan them normally and photoshop them (in the Gimp of course:), inverting the tones and adjusting the contrast or curves as you would do anyway in the darkroom. The results were really pretty good. Unfortunately I couldn't scan my 20x24 paper negative. But I did persuade a friend to take a photograph of me holding it up. And then I photoshopped this, inverting the tones and adjusting the contrast on the computer. The result is this.

Wow... what a camera and what a result!!!
ReplyDeleteI'd love to hear more about the film lith you used... seems interesting.
Have you heard about the Ilford positive paper? It's not expensive and I guess you could get some intersting results...
sorry... forgot to answer your question. I didn't try using the autographic setting. In fact I was so exciting using the camera that I completely forgot!!
ReplyDeleteHi! Yes, I am certainly going to describe the lith film and the developer I'm using sometime quite soon.
ReplyDeleteYes, I tried the Harman direct Postive paper - I still have some. It's not as cost effective as the lith film plus ordinary paper I'm using, but I should try that again some time.